
안녕하세요! 오늘은 Oracle Cloud Infrastructure(OCI)에서 운영되는 WordPress 사이트를 HTTPS로 전환하는 전체 과정을 상세히 알아보겠습니다. 이 가이드는 Oracle Linux 8 환경에서 Let's Encrypt SSL 인증서를 사용하여 WordPress를 안전하게 HTTPS로 전환하는 모든 과정을 다룹니다. 실제 현장에서 경험한 문제들과 해결 방법도 함께 공유드리겠습니다.
 HTTPS, 정말 필요할까요?
HTTPS는 현대 웹사이트의 필수 요소가 되었습니다. 특히 OCI와 같은 엔터프라이즈 환경에서는 더욱 중요한데요, 주요 이점을 살펴보겠습니다:
보안적 이점
•
데이터 암호화를 통한 개인정보 보호
•
Oracle Linux 8의 강화된 보안 기능과의 시너지
•
OCI 네트워크 보안과의 통합
SEO 및 사용자 경험
•
Google 검색 순위 개선
•
브라우저의 보안 경고 제거
•
전문성과 신뢰도 향상
기능적 이점
•
HTTP/2 지원으로 성능 향상
•
OCI Load Balancer 통합 가능
•
PWA(Progressive Web Apps) 지원
OCI 환경 사전 준비사항 {#preparation}
필수 요구사항 체크리스트
OCI 컴퓨트 인스턴스 접근 권한
Security List에서 포트 80, 443 개방
등록된 도메인 및 DNS 설정
sudo 권한이 있는 사용자 계정
시스템 환경 확인
# OS 버전 확인
cat /etc/oracle-release
# 예상 출력: Oracle Linux Server release 8.x
# SELinux 상태 확인
getenforce
# 예상 출력: Enforcing
# Apache 버전 확인
httpd -v
# 예상 출력: Server version: Apache/2.4.x
Bash
복사
필요한 패키지 설치
# EPEL 저장소 활성화
sudo dnf install oracle-epel-release-el8
sudo dnf config-manager --set-enabled ol8_developer_EPEL
# 필수 패키지 설치
sudo dnf install httpd mod_ssl php php-mysqlnd php-fpm php-json php-gd php-curl php-xml php-mbstring php-opcache
Bash
복사
설치 완료 후 서비스 시작:
# PHP-FPM 시작 및 활성화
sudo systemctl start php-fpm
sudo systemctl enable php-fpm
# Apache 시작 및 활성화
sudo systemctl start httpd
sudo systemctl enable httpd
# 상태 확인
sudo systemctl status php-fpm
sudo systemctl status httpd
Bash
복사
OCI 네트워크 설정
HTTPS 설정 전에 두 가지 중요한 네트워크 설정을 확인해야 합니다:
1.
OCI Security List 설정 (OCI 콘솔에서 확인)
•
포트 80 (HTTP) 인바운드 규칙
•
포트 443 (HTTPS) 인바운드 규칙
•
VCN > Security Lists에서 확인 및 설정 가능
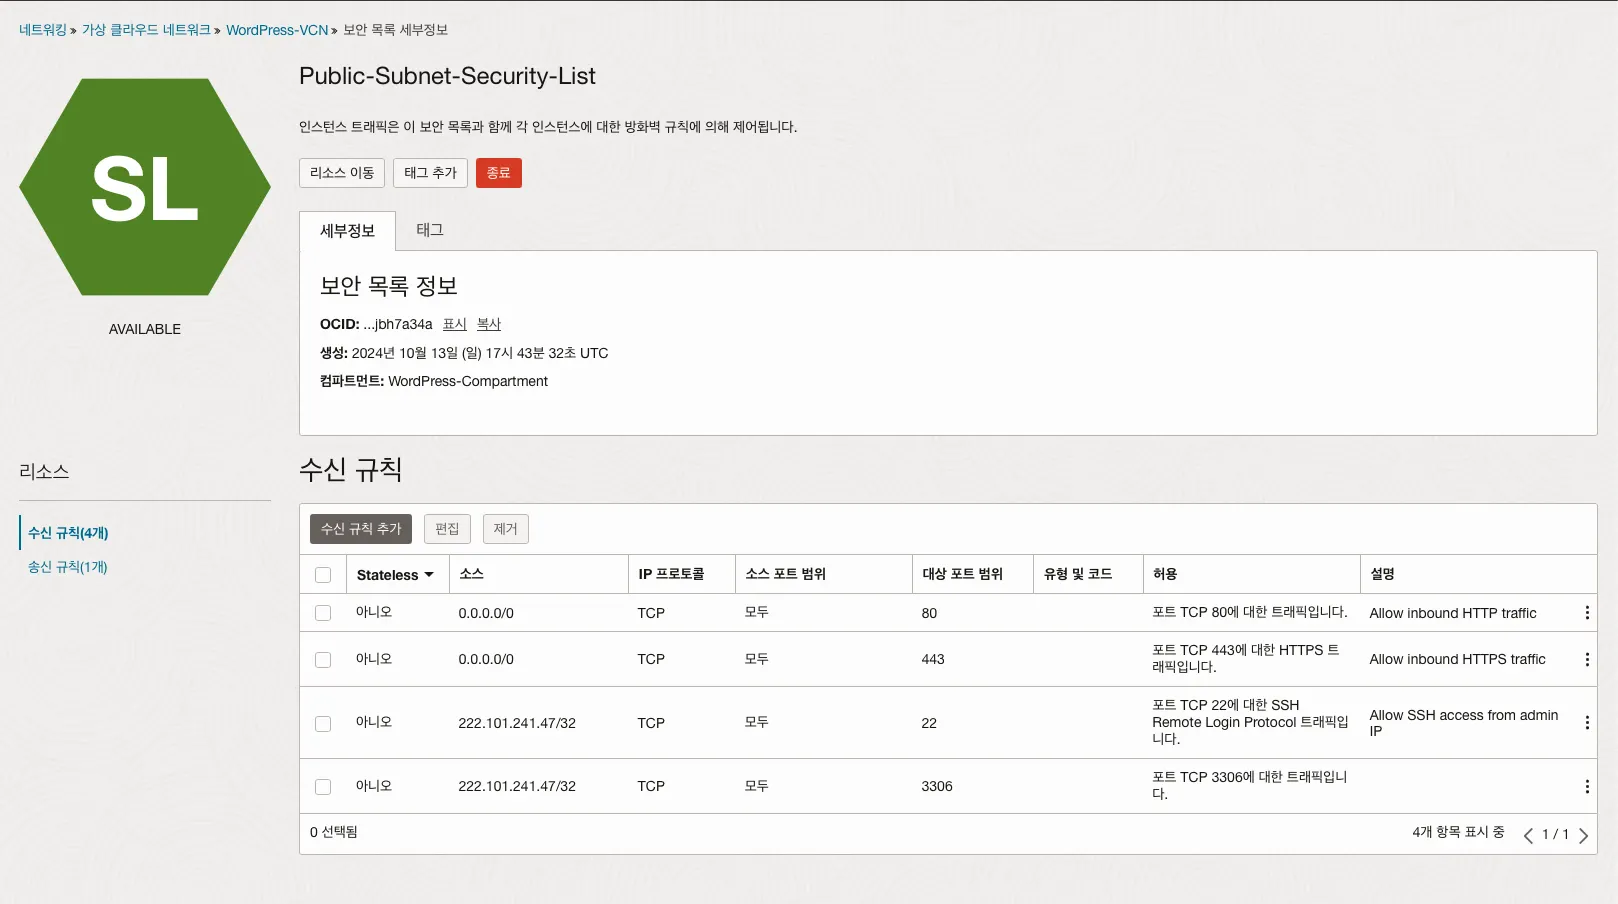
Public-Subnet-Security-List
2.
서버 방화벽 설정 (WordPress 서버에서 확인)
# 현재 방화벽 설정 확인
sudo firewall-cmd --list-all
# 필요한 경우 HTTP/HTTPS 포트 개방
sudo firewall-cmd --permanent --add-service=http
sudo firewall-cmd --permanent --add-service=https
sudo firewall-cmd --reload
# 설정 확인
sudo firewall-cmd --list-all
Shell
복사
방화벽 설정 결과에 http와 https가 services 목록에 없다면 위 명령어로 추가해주세요.
기존 설정 백업 {#backup}
중요 설정 파일들을 백업합니다:
# Apache 설정 백업
sudo cp /etc/httpd/conf/httpd.conf /etc/httpd/conf/httpd.conf.bak
sudo cp /etc/httpd/conf.d/ssl.conf /etc/httpd/conf.d/ssl.conf.bak
# PHP 설정 백업
sudo cp /etc/php.ini /etc/php.ini.bak
sudo cp -r /etc/php-fpm.d /etc/php-fpm.d.bak
# WordPress 설정 백업
sudo cp /var/www/html/wordpress/wp-config.php /var/www/html/wordpress/wp-config.php.bak
Bash
복사
Apache 및 PHP 설정
PHP-FPM 설정
먼저 필요한 패키지들을 설치합니다:
sudo vi /etc/php-fpm.d/www.conf
Shell
복사
주요 설정 내용:
[www]
user = apache
group = apache
listen = /run/php-fpm/www.sock
listen.owner = apache
listen.group = apache
listen.mode = 0660
pm = dynamic
pm.max_children = 50
pm.start_servers = 5
pm.min_spare_servers = 5
pm.max_spare_servers = 35
Shell
복사
설정 후 PHP-FPM 재시작:
sudo systemctl restart php-fpm
sudo systemctl status php-fpm
Bash
복사
Apache 가상 호스트 설정
sudo vi /etc/httpd/conf.d/wordpress.conf
Bash
복사
# HTTP VirtualHost
<VirtualHost *:80>
ServerName yourdomain.com
ServerAlias www.yourdomain.com
DocumentRoot /var/www/html/wordpress
<Directory /var/www/html/wordpress>
Options Indexes FollowSymLinks MultiViews
AllowOverride All
Require all granted
</Directory>
# HTTP to HTTPS redirect
RewriteEngine On
RewriteCond %{HTTPS} off
RewriteRule ^(.*)$ https://%{HTTP_HOST}%{REQUEST_URI} [L,R=301]
</VirtualHost>
XML
복사
Apache 재시작:
# 설정 문법 검사
sudo httpd -t
# Apache 재시작
sudo systemctl restart httpd
sudo systemctl status httpd
Bash
복사
DNS 설정 검증
도메인 설정이 제대로 되어 있는지 확인하세요:
# 도메인 확인
dig yourdomain.com +short (ex. datainhands.com)
# 결과가 여러분의 서버 IP와 일치해야 합니다
Shell
복사
중요 팁: DNS 설정 변경 후에는 전파되는 데 시간이 걸립니다. 최대 48시간까지 기다려야 할 수 있으니 여유를 가지고 진행하세요! Let's Encrypt SSL 인증서 설치하기
WordPress 가상 호스트 설정
먼저 WordPress의 가상 호스트 설정을 생성합니다:
sudo vi /etc/httpd/conf.d/wordpress.conf
Shell
복사
다음 내용을 입력:
# HTTP
<VirtualHost *:80>
ServerName yourdomain.com
ServerAlias www.yourdomain.com
DocumentRoot /var/www/html/wordpress
<Directory /var/www/html/wordpress>
Options Indexes FollowSymLinks MultiViews
AllowOverride All
Require all granted
</Directory>
# HTTP to HTTPS redirect
RewriteEngine On
RewriteCond %{HTTPS} off
RewriteRule ^(.*)$ https://%{HTTP_HOST}%{REQUEST_URI} [L,R=301]
</VirtualHost>
# HTTPS
<VirtualHost _default_:443>
ServerName yourdomain.com
ServerAlias www.yourdomain.com
DocumentRoot /var/www/html/wordpress
SSLEngine on
SSLCertificateFile /etc/letsencrypt/live/yourdomain.com/fullchain.pem
SSLCertificateKeyFile /etc/letsencrypt/live/yourdomain.com/privkey.pem
<Directory /var/www/html/wordpress>
Options Indexes FollowSymLinks MultiViews
AllowOverride All
Require all granted
</Directory>
</VirtualHost>
XML
복사
Certbot 설치
# Certbot 설치
sudo dnf install certbot python3-certbot-apache
Shell
복사
SSL 인증서 발급
# 인증서 발급
sudo certbot --apache -d yourdomain.com -d www.yourdomain.com
XML
복사
인증서 발급 후 자동으로 Apache 설정이 수정됩니다. Apache 재시작:
sudo systemctl restart httpd
Bash
복사
SSL 설정 확인:
sudo httpd -t
sudo certbot certificates
Bash
복사
WordPress HTTPS 설정 {#wordpress-setup}
wp-config.php 설정
WordPress 설정 파일에 HTTPS 관련 설정을 추가합니다:
sudo vi /var/www/html/wordpress/wp-config.php
Plain Text
복사
다음 내용을 추가:
// HTTPS 설정
define('WP_HOME', 'https://yourdomain.com');
define('WP_SITEURL', 'https://yourdomain.com');
define('FORCE_SSL_ADMIN', true);
// 추가 설정
define('DISALLOW_FILE_EDIT', true);
define('WP_HTTP_BLOCK_EXTERNAL', false);
PHP
복사
yourdomain.com을 여러분의 도메인 이름으로 변경해 주세요.
SELinux 설정
SELinux가 활성화된 환경에서는 다음 설정이 필요합니다:
sudo setsebool -P httpd_can_network_connect on
sudo setsebool -P httpd_can_network_connect_db on
sudo setsebool -P httpd_unified on
Shell
복사
데이터베이스 URL 업데이트
WordPress 데이터베이스에서 모든 HTTP URL을 HTTPS로 변경:
UPDATE wp_options SET option_value = replace(option_value, 'http://', 'https://')
WHERE option_name = 'home' OR option_name = 'siteurl';
UPDATE wp_posts SET guid = replace(guid, 'http://', 'https://');
UPDATE wp_posts SET post_content = replace(post_content, 'http://', 'https://');
UPDATE wp_postmeta SET meta_value = replace(meta_value, 'http://', 'https://');
SQL
복사
문제 해결 가이드
자주 발생하는 문제와 해결 방법
1.
**PHP가 작동하지 않는 경우**
# PHP-FPM 상태 확인
sudo systemctl status php-fpm
# 소켓 파일 권한 재설정
sudo chown apache:apache /run/php-fpm/www.sock
sudo chmod 0660 /run/php-fpm/www.sock
# PHP-FPM 재시작
sudo systemctl restart php-fpm
Bash
복사
2.
**SSL 인증서 문제**
# 갱신 테스트
sudo certbot renew --dry-run
# 인증서 상태 확인
sudo certbot certificates
# 실제 갱신
sudo certbot renew
Shell
복사
3.
Mixed Content 경고
•
Chrome 개발자 도구에서 확인
•
WordPress 관리자 페이지에서 "Settings > General" 확인
•
데이터베이스 내 URL 업데이트 확인
4.
SELinux 관련 문제 해결
# SELinux 설정
sudo setsebool -P httpd_can_network_connect on
sudo setsebool -P httpd_can_network_connect_db on
sudo setsebool -P httpd_unified on
Shell
복사
보안 강화하기
Apache 보안 설정
1.
mod_security 활성화
sudo dnf install mod_security
sudo systemctl restart httpd
Shell
복사
2.
강화된 SSL 설정 적용
# SSL 설정 파일 열기
sudo vi /etc/httpd/conf.d/ssl.conf
Shell
복사
이 파일에서 아래 부분을 찾아서 수정하거나, 파일 끝부분에 추가하면 됩니다:
SSLProtocol all -SSLv3 -TLSv1 -TLSv1.1
Header always set Strict-Transport-Security "max-age=63072000"
SSLHonorCipherOrder on
Plain Text
복사
설정 변경 후에는 Apache 문법을 체크하고 서비스를 재시작해야 합니다:
# 설정 문법 확인
sudo httpd -t
# 이상 없으면 Apache 재시작
sudo systemctl restart httpd
Shell
복사
이 설정들은 웹사이트의 SSL/TLS 보안을 강화하여 SSL Labs 테스트에서 A+ 등급을 받는데 도움이 됩니다.
WordPress 보안 설정
1.
파일 권한 설정
# WordPress 디렉토리 권한
sudo find /var/www/html/wordpress -type d -exec chmod 755 {} \;
sudo find /var/www/html/wordpress -type f -exec chmod 644 {} \;
# wp-config.php 보호
sudo chmod 600 /var/www/html/wordpress/wp-config.php
sudo chown apache:apache /var/www/html/wordpress/wp-config.php# WordPress 디렉토리 권한
sudo find /var/www/html -type d -exec chmod 755 {} \;
sudo find /var/www/html -type f -exec chmod 644 {} \;
Shell
복사
유지보수 가이드 {#maintenance}
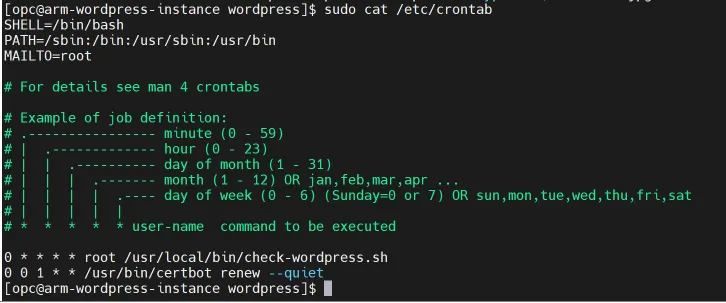
자동 인증서 갱신 설정
# crontab에 갱신 작업 추가
echo "0 0 1 * * /usr/bin/certbot renew --quiet" | sudo tee -a /etc/crontab
Shell
복사
정기 점검 항목
•
SSL 인증서 만료일 확인
sudo certbot certificates
Bash
복사
•
서비스 상태 확인
sudo systemctl status httpd
sudo systemctl status php-fpm
Bash
복사
•
백업 상태 확인
•
로그 파일 검토
sudo tail -f /var/log/httpd/error_log
sudo tail -f /var/log/php-fpm/error.log
Bash
복사
최종 확인
설정 완료 후 다음 사항들을 확인하세요:
1. HTTPS 연결 확인
- 브라우저에서 자물쇠 아이콘 확인
- SSL Labs 테스트 실행
- Mixed Content 경고 확인
2. WordPress 기능 점검
- 관리자 페이지 로그인
- 미디어 업로드 테스트
- 플러그인 설치/업데이트 테스트
3. 성능 확인
- 페이지 로딩 속도 테스트
- HTTPS 리다이렉션 동작 확인
마치며
이것으로 Oracle Linux 8 환경에서 WordPress를 HTTPS로 전환하는 전체 과정을 살펴보았습니다. 각 단계마다 설정을 변경한 후에는 반드시 관련 서비스를 재시작하고 상태를 확인하시기 바랍니다.
유용한 참고 자료
- [Let's Encrypt 공식 문서](https://letsencrypt.org/docs/)
- [Apache SSL/TLS 설정 가이드](https://httpd.apache.org/docs/2.4/ssl/)
- [WordPress HTTPS 마이그레이션](https://wordpress.org/support/article/https-for-wordpress/)
- [Oracle Linux 8 문서](https://docs.oracle.com/en/operating-systems/oracle-linux/8/)
이 가이드는 2024년 12월 기준으로 작성되었으며, 소프트웨어 버전이나 인터페이스는 변경될 수 있습니다.